DIY!

Some totally fab DIYs I have found all over the internet!


fur-booties-diy.jpg
DIY-whiz Erica Domesek's latest boots with fur project has us revisiting Flo-Rida's greatest hit... But these booties are less "Apple Bottom jeans" and more "Alexander Wang hottie". Check out how she concocted this statement shoe with only a few, basic steps. 

Materials:

  • Faux fur
  • Scissors
  • Socks
  • Glue gun (or fabric glue)
Directions:
  • Cut the footies off a pair of socks.
  • Position sock tube onto piece of faux fur and adhere together with glue. Continue to glue until sock is covered.
  • Slide fur ankle warmer on foot and add a bootie!


If DIY friendship bracelet-style necklaces are a piece of cake for you now, graduate to the newest offerings from the handy ladies over at Honestly WTF. In their latest post, they showed us how to braid and glue your own Proenza Schouler rope necklace. With a few materials from outdoor outfitters shops, you'll be able to craft your own multi-colored statement necklace that's already on your wishlist. 

proenza-schouler-rope-necklace-1.jpg


proenza-schouler-rope-necklace-2.jpg

proenza-schouler-rope-necklace-3.jpg


A Fenton Necklace in 4 Steps


diy-necklace-step1.jpg

Step # 1: Gather all your elements. In this case, a choker strand of fake pearls, four different color chains, and three jewel strands. You will need pliers, 12 jump rings, and a clasp. 

diy-necklace-steps-2-3.jpg

Step # 2: Create two different pieces with the strands. Here the first piece consists of the pearls, one of the jewel strands, and two chains. The other piece consists of two jewel strands and two chains. Using pliers, open a jump ring and attach all four strands to it for the first piece. Then place the clasp on the jump ring, and close the jump ring. For the second piece do the same, but a clasp is not needed.

Step # 3: Clasp the two pieces together and hang on neck. Take the pearl strand, wrap around the neck, and attach an open jump ring. Hook the pearl strand's open jump ring to the other piece's closed jump ring using pliers.

diy-necklace-fenton-step-4.jpg

Step # 4: Begin winding individual strands around the pearl strand. Attach a jump ring to each individual strand, and attach that to the pearl strand's jump ring. Do this until every strand is wrapped around and attached to the pearl strand's jump rings. 


new-york-design-shop.jpg


new-york-design-shop-2.jpg
new-york-design-shop3.jpg


 A Camel Cape


diy-camel-blanket-cape-coat.jpg
Supplies: Camel-colored blanket
Fabric Scissors
Template
Fabric Glue
Buttons
Needle and Thread
Directions: 

1. Fold blanket in half and position so the folded crease is at the top. 

2. Lay a template in the center and cut along the dotted lines, making sure you don't cut through both layers of the blanket.


diy-camel-blanket-cape-coat-2a.jpg

3. Fold the edges of the neckhole and glue down with fabric glue. 

4. Sew two buttons to keep the sides closed, which create your arm holes.


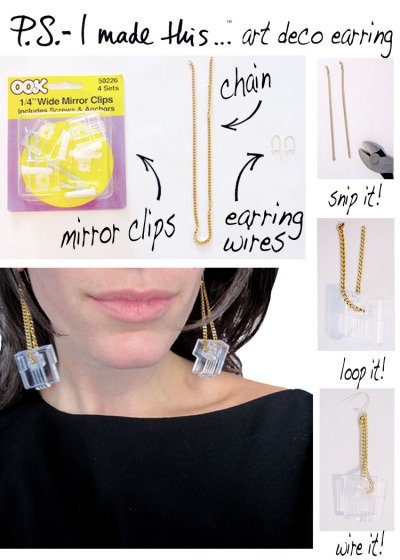
Your Own Cut-Out Gem Earrings

diy-gem-earrings-paper-1.jpg
You'll need: 

Craft Glue Stick (available at Joann Fabric) Luxury Magazine Tears
Scissors
Ribbon
Earring Wires 
Glue Gun
Mod Podge
Paint Brush

diy-gem-earrings-paper-2.jpg


Directions:
Tear through your favorite fashion magazines, ripping out ads and editorials that are heavy on the bling.


Use your scissors to trim your gem cut-outs. 


Lay out a pattern for your earrings and glue onto card stock with a craft glue stick.


diy-gem-earrings-paper-3.jpg


Paint on a layer of Mod Podge using a paintbrush.


After Mod Podge dries, cut out the earring and glue it to a piece of ribbon.


Trim the ribbon, leaving a slim boarder around the earrings, and add your earring wires.


Gloat.


diy-gem-earrings-paper-4.jpg


Above: Erica's inspiration; The final product!


Louis Vuitton Bow Pumps For A Runway Look On The Cheap!

diy-louis-vuitton-shoe-bow-1.jpg
diy-louis-vuitton-shoe-bow-2.jpg


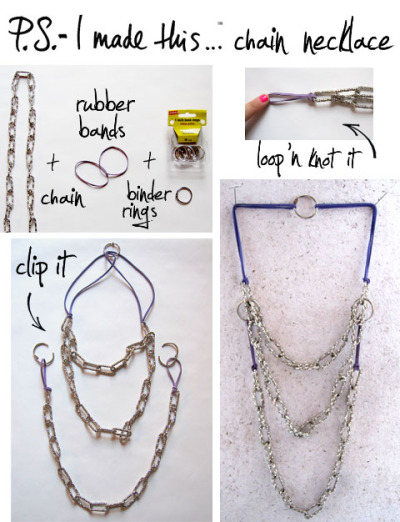
Braid Your Own Colorful Friendship Necklaces

diy-friendship-necklace-1.jpg
diy-friendship-necklace-2.jpg


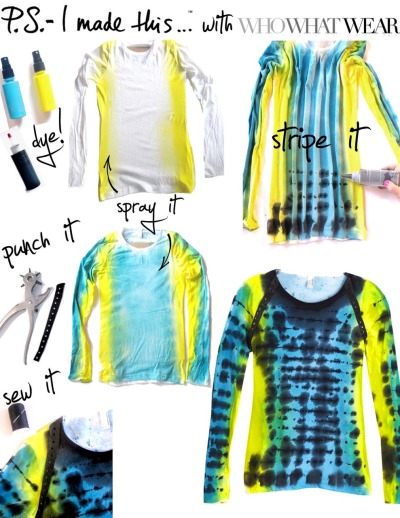
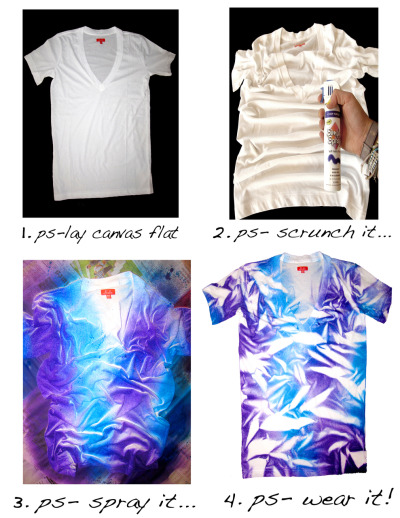
Tie-Dye Your Own Suno-Style Prints

shibori-tie-dye-diy-1.jpg
shibori-tie-dye-diy-2.jpg


See all!


We’re all Material Girls, living in Material worlds, thanks to Madonna and Maripol!  Although Madonna knew how to “Express Herself”, it was her friend and mother of all stylists, Maripol who created and crafted iconic looks into Fashion’s hall of fame!  A recent comeback and kick a** capsule collaboration with Marc Jacobs, has old fans freaking and newbies in the know.  The entire collection pays homage to her rubber stretchy bracelets, bobby pin necklaces, & neon flairs, all donning her signature tri-bolbus DNA structure-like tag.  Get ‘em while you can… P.S. the packaging is also DOPE (wouldn’t expect anything less). To make your own stunning chic collar statement necklace hit up your local coffee shop.  The lovely people at Dunkin’ Donuts had these cranberry colored coffee stirrers for my Designer DIY.  Get creative with colors and collar shape by shaping with a few snips after you sew the straw on.  Make sure you double up your thread for extra support. P.S.- Check out Maripol’s site to get inspired, and see more of her outrageous Polarama world!  http://www.maripolitan.com  Thank you Marc and Maripol for teaming up-truly J’amazing!


A Green Beanie Out Of Sweatpants

dasani-green-hat.jpg


Make Your Own Fendi Shoe Accessories

diy-fendi-fabric-strap-shoe-1.jpg
diy-fendi-fabric-strap-shoe-2.jpg


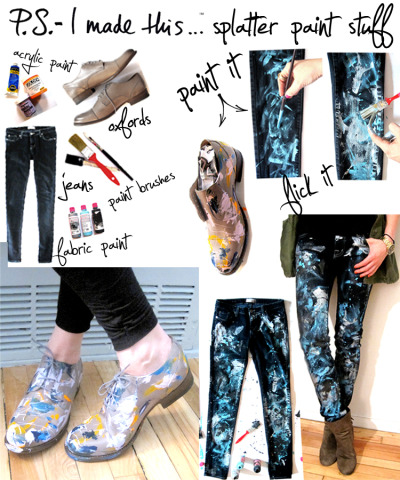
The Splatter-Paint Trend

Jeans
diy-splatter-jeans-how-to.jpg
What you need:
1. Paint brushes—available at hardware stores and art supply stores.
2. Fabric paint—available at any craft store.
3. Jeans—we like a classic, skinnier cut for this look best.
4. Newspaper or a dropcloth

What to do:
1. Cover an even surface with newspaper or a dropcloth and lay jeans down flat.
2. Start by brushing random strokes of paint onto your jeans.
3. Using the paintbrush and your hand, gently flick paint spots and splotches to blend with strokes.
4. Let jeans dry flat before wearing, about two hours.


OXFORDS

splatter-paint-shoes-how-to-mcqueen.jpg

What you'll need: 1. Paint brushes—available at hardware stores and art supply stores.
2. Paint—use acrylic or samples from your local paint store.
3. Oxford shoes—We love these from Urban Outfitters or check out their other options.
4. Newspaper or dropcloth

What to do:
1. Remove shoelaces.
2. Stuff each shoe with newspaper and place on an extra sheet of paper or a dropcloth.
3. Start by brushing random strokes of paint onto shoes.
4. Using the paintbrush and your hand, gently flick paint spots and splotches to blend with strokes.
5. Let shoes dry, about an hour, and re-lace.


Everything’s coming up roses! The metallic movement is in full force.  Traditional yellow gold is taking a back seat to the nowness of rose gold.  The cool combination of gold and copper alloy create a brilliance that will stands out in every way, shape, and form. The unexpected metal hue of rose gold nods to luxurious living with vintage flair accents.  Look to Cartier who incorporates the intense element into watches, rings and all sorts of fab things!  Nicholas Kirkwood dazzles decedent crazy-cool-heels in this amazing hue to boot! To create an easy breezy beautiful rose gold statement necklace, take a trip to your local hardware store and pick up copper pipe fittings, also known as couplings. Available in elbow shapes as well as straight options, these materials will cost pennies.  Major bang for your buck, so stock up!  String onto a contrasting ribbon or rope and rev up for a healthy reality of rose gold.


P.S.- you stand out, so why shouldn’t your accessories?  This is knot your typical ear warmer.  Take a DIY approach on the turban tie-up, add some sweetness, and P.S. your own version.  Get excited to craft and capture some street chic vibes. For the foundation of the ear warmer, reach into your drawers and re-purpose a sock! If you’re like me and have a few “lone solider” socks, this is a great way to re-purpose them.  First, layer a thin scarf (or opt for a piece of fabric) on the sock.  Make sure the 2nd layered fabric is longer than the sock base.  Knot the two together, band the sides, trim with sharp scissors and you are ready to rock it. Secure in the back by tying the ends together. 


It was an affair to remember at Kate Spade!   I have been a fan of this iconic brand since day one, and had the  pleasure of getting creative and crafty with their namesake  London tote.  Deborah Lloyd, Chief Creative Officer, and I hosted a fete  at the Flagship Broome Street store in celebration of my BOOK.  A handful of my closest creative friends from Design*Sponge, Fashionista.com, StyleRepublic Magazine, Lonny Magazine, and style guru Andrew Mukamal, got their DIY on and did not disappoint! Deborah even joined in on the fun.  Check out the PICTURES of everyones exceptionally creative, one-of-a-kind “PS’ed” designs, as well as the bevy of other fabulous guests who customized Limited Edition “P.S.- I made this… with Kate Spade” bags. P.S.-  My bag was painted with Hudson Chalk board paint (yes! you can draw and  erase on the surface), studded on the bottom with edgy silver spikes from M&J, faux stitched with Sharpies, and finished off with a bag charm (chalk not  included)!  Take a page from Kate Spade’s world of style and remember to have fun, and have courage- don’t be shy with your DIY!


Fall Fashion aside, another reason why I love Autumn is that it’s APPLE PICKING season!  Ever since I was a kid, I have LOVED heading out to the country to gather up some crisp, delicious fruit.  On a recent day trip, I drove my Ford Edge to Wilklow Orchards in Highland, NY.  On my long drive outside NYC, I spotted beautiful fall foliage and collected ‘oodles of apples. For more on my amazing DAY, which turned into a home décor DIY, Click HERE! I re-purposed my bushel basket because I wasn’t ready to part with the cool container.  I added some shiny dome studs, dropped in a lamp kit, wrapped the cord with rope and the result was this fun pendant lamp. Check out the full step by step DIY on Design*Sponge.  P.S.- I also made baked apples and my FAMOUS strawberry rhubarb applesauce. I see it.  I like it.  I make it… (i also eat it!) P.S.- Ford  has provided me this 2011 Edge, gas and insurance to use as my primary  vehicle for three months.  In exchange, I will post videos, photos, and  blogs that document my use of this vehicle in my everyday life.  http://cmp.ly/6/uep9w6


Fashion, art, and creativity make the world go ‘round.  When all are combined, endless and innovative magic happens.  The never-ending cycle of a circle is something that is sought after.  This season, set your sights not only on infinite possibilities, but also scarves!  The circle scarf has become a staple in everyones’ wardrobe.  Infuse the essential chunky knit to stay cozy and au currant.  Continuous knit circle scarves can be worn long and loose or wrapped up right.  Either way you style it,  circle gets the square! To create your own DIY circle scarf, simply cut off the bottom half of your sweater, hem the raw edge with Gorilla Tape by sticking halfway down, and folding over to seal.  After completely “hemmed”, roll underneath several times to hide the tape and create a soft edge.


Cut - it - out… Literally!  There’s no time like the present to give yourself a present!  Being crafty and creating fun fashions can take seconds.  Case in point: The cut out sweatshirt! REIMAGINE, REUSE, &  REINVENT this very instant.  Take two things you probably already have at home: a sweatshirt and your trusty scissors and get inspired by the casual cool Alexander Wang and the athletic inspired looks were seeing all around.  Going the distance is easy when you sport the sporty look like a DIY Champ! P.S.- My good friends at Fashionista.com and I both agree that GREY is the new BLACK!  We teamed up for a fun video DIY.  Click HERE to watch the how-to- and say P.S.- I made this…!


What’s a party without a Cardi?  The quintessential cover up got its name from a British military commander, James Brudenell who was the “7th Earl of Cardigan”.  Crazy, cool fact-right?!  Traditional, classic and sophisticated cardigans have totally transformed and transcended, making their mark as an everyday essential.  My j’amazing, fashionable friends, Hillary and Katherine of Who What Wear, and I agreed- we’re all crushin’ on Marc Jacobs FW10 knits.  The backwards styling seen on the catwalk made us ooooooh and aaaaaah, and decide to collaborate for this Designer inspired DIY.  Get swept up in the sweater storm and update an existing cardigan with uber chic, sparkly, and ornate buttons… AND WEAR IT BACKWARDS! Old Navy has great cardigans or you can re-purpose one from your closet. Use vintage buttons or purchase some-  my gems are from  M&J Trim. Make sure to sew buttons on the side where the button holes are, and the original buttons will still go through the existing button hole.  P.S.-DO NOT COVER THE BUTTON HOLES!  The decorative buttons, will cover the existing ones when buttoned up.  Note: Be a style warrior and wear your buttons on the back -if you want to be a front-runner in fashion!


Peruse your closet and prepare to POM! Currently, we’re seeing the fluffy pom pom detail all around us.  Marc Jacobs and Stella McCartney have made a seasonal statement with touches of pom poms on bags, whereas Sonia Rykiel took to the Pom as inspiration for the hair shown at her FW10 show.  We can’t get enough of this puffy and whimsical wonder. Right now, grab a bag… embrace this cozy and cute trend, get inspired and get crafty.  I opted for this cute FOREVER 21 bag paired with gray POM POMS. Use your trusty glue gun and dot a dab of glue on each pom and place on the bag. Make sure you don’t leave too much space between each pom, they should completely cover your surface.  Feel free to get creative with your colors and infuse the pom on practically anything and everything! P.S.- October is Breast Cancer awareness month- try and infuse the color and cause into your life! Sharpie is spreading the word, which benefits The City of Hope! Get involved.


Do you MARVEL over MARBLE? I DO!  Whirls, swirls, twists and turns is the name of the game.  Marble surfaces, sculptures, and architecture have made their mark in history for centuries.  The delicious markings have inspired fashion, accessories, apparel, home decor and even food!  I teamed up with my friend Grace Bonney of Design*Sponge, where I showed her how to MARBLE PAPER and make cool things.  P.S.- It’s very easy, and SO fun.  Anyone can do it and it ALWAYS turns out looking J’AMAZING!  CLICK HERE to watch the DIY video.  Learn how to marble your own paper, and create decedent lamp shades, necklaces, and stationary!  All you need is Methyl Cellulose, Paint, and Cotton/Watercolor Paper (the rest you probably have at home but check out the full tutorial on Design*Sponge).  P.S.- For a shortcut, purchase decorative marble paper at your local fine art store and get creative!


If you roar or rip through life, chances are you don’t waste time mussing and fussing over a raw edge- in fact, you welcome them with open arms!  That’s just what the phenomenal designing duo, Rodarte creates season after season.  This Fall we are seeing lots of tears, shreds, twists, unfinished seams, fabrics, & fibers galore.  Adding a bulky texture into your Autumn outfit is au currant; and beautifully bold when worn in a pleasing palate.  Drape yourself in a statement necklace and look ultra luxe a la Lanvin. Repurpose items in your closet or go to a fabric story and simply ask for swatches of an alike color palate. P.S.- THEY ARE FREE! Cut into leaf-like shapes, slit with fabric scissors and slide onto a ribbon.  Add some knots for a touch of texture and you should be happy with something scrappy… and chic! P.S.- DON’T FORGET TO CLICK HERE to watch the DIY HOW-TO with DAILY CANDY!


Bow down to the bow trend, which the Who What Wear team and I j’adore beaucoup! (translation… we’re crazy over bow heels).  Inspired by the sophisticated Isabel Marant and Louis Vuitton versions, we wanted to do our own take on an chic baby bow that will twinkle your toes with a touch of talent- via Designer DIY.   Grab some textured leather ribbon from M&J Trim and a sheet of Momi Paper (avail at any fine art store, (fabric with a dense weight will also work for the knotted bow). Have your glue gun, scissors, and Velcro on hand and you’re good to bow it up!  P.S.- CLICK HERE for my step-by-step directions! Make all sorts of flirty and fun bows, velcro to just about any pair of shoes (add dabs of glue to secure the velcro)!


Pantone declared TURQUOISE as the color of 2010.  I must admit I’ve always declared my devotion to this rock solid hue!  Turquoise, the blue-ish green-ish mineral gets tumbled into stones, polished into perfect accessories, and painted all over town.  This happy hue of a rock, makes any outfit pop and standout.  My fashion friends, TORY, RALPH, & OSCAR often drip and drape collections always making it work in turq! To make your version of the turquoise-inspired statement necklace, hit up local toy stores, 5 and Dimes, or AMAZON for Parachute Men toy soldiers. Purchase a few packs and pick out all the blue ones.  Another option is to spray paint them with a coat of turq paint, if you cant find the hue you want. Find your center point of the necklace, knot on the middle man, and continue to space equal distance on both sides, securing with knots as you go.  Double knot a turquoise ribbon on either end, and snip excess.  P.S.- Look fab, look poised… look chic in your faux turquoise!


Slap on an apron, it’s time to stir up your fashion croc pot for a super chic ‘n classy case.  Boxy silhouette bags are making a huge comeback for Fall/Winter 2010.  Louis Vuitton is bringing the sexy lady back, while Ralph Lauren continues to knock us out with versions of his famously luxe Ricky bag (yes! Named for RL’s knock-out wifey). To make a faux croc carryall of your own, purchase or re-purpose a lunchbox.  Use tools to punch two holes in each side.  Thread chain (test out a desired length before cutting) through one side, and connect with pliers after threading through the other side.  Add dome nail heads onto the bottom corners for “feet” by pushing and bending back sharp pronged corners.  Finish off with a j’amazing brooch that’s DIYing for a reinvention.  P.S.- I love all things wild and animal-eque… a la Kieselstein-Cord! 


P.S.- NEVER SAY NEVER TO NEON!  I love infusing bright and funky highlighter shades into my world.  My good friend, the uber talented Ben Watts, is known for his always electric and punchy photos.  I’m always inspired by his fashion infused Art and Photography. Chances are you have seen Watt’s work gracing International fashion magazines and billboards. His 2nd and most recent book that came out this year, Lickshot, is dope- so check it! Also, he contributed some fab shots to my new Book, so get excited! To make this fun, eye-catching, crazy-cool heels- hit up your local sporting goods store for reflective running bands.  I picked up a thick and thin style at Eastern Mountain Sports and Modell’s.  Use the already existing velcro (trim down if necessary) and wrap around your heels.  It’s a quick and easy way to rev-up and re-vamp your stems! 


Lucky Charms are magically delicious and so is JEWELRY!  One of my favorite jewelry designers, Dana Lorenz of Fenton/Fallon continues to wow us season after season with her over-the-top statement pieces, terrific textures, and sparkling situations. Dana recently invited me and a few other fab friends over and let us loose in her shop. She graciously gifted charms and broken pieces of past collections for a special P.S. project!  I loved the idea of blinging out my fall bag with a bag charm using her fun elements. To create a chic bag charm, re-purpose broken or old jewlez, charms, pendants, pieces, basically anything fun you can get your hands on.  Tie your bits and bobs onto string or cording and secure to a binder ring. Make sure you hang at different lengths to create a staggered effect. Clip onto your bag with a carabiner clip and you are one leading lucky charm lady!


Put a little PEP in your step and a WOW in your wardrobe with a refined, sophisticated, and slightly sultry peplum skirt! These classic styles that were once on hiatus are premiering on the runways and back on television.  AMC’s Mad Men is in one word J’AMAZING! Take style notes from Joan Holloway who proves that pencil (skirts) and pen (necklaces) are a must.  Banana Republic is having a Casting Call for Mad Men… I wonder if Don Draper is judging? To create a retro-inspired skirt, reach for a curtain panel (use a panel with a skirted top).  Gather, and pin top (front) to create a slight pleat every few inches.  Sew and reinforce with stitching where pins are holding material in place. Flip material to the backside.  Cut to desired length and hem by stitching. To finish off the back, use kilt pins to connected material. Cinch and style with a bold belt and you’ve got a perfect peplum! P.S.- Click here to submit your best Mad Men style and enter for a walk-on role on the show.  I think my friend Jessica from What I Wore is spot on!


We are all giddy and ruffling our feathers to kick off the summer season.  Keeping cool and looking good is easy, breezy and effortless with the help of our light-hearted friend, the ruffle!  Whimsical breaths of girlish charm show a playfulness and elude to an anything-goes-attitude!  Mixing the ruffle with the ever-popular asymmetrical trend results in a summer crush that wont let you down. Purchase a pack of white tees (the more tees, the more ruffles you can create).  Cut off a few inches from the bottom hem.  The wider the panel, the larger the ruffle. Cut off one sleeve with sharp fabric scissors for the asymmetrical neck.  Scrunch, pin, and sew to the diagonal neckline.  If your tee is too loose around the underarm, add a few stitches or pin it to achieve the perfect fit! 


July 4th holds a very special place in my heart.  I share the same name and birthplace with our beloved country, amERICA (get it!?).  The historic city of Philadelphia hosted the signing of the Declaration of Independence in 1776 and also has stars & stripes bragging rights because of another crafty lady Betsy Ross, who stitched up our Nation’s flag there.   Celebrate Independence Day the right way and pay homage to amERICA the beautiful’s birthday with a barbecue!  Think twice this year before you discard the dishes and cutlery.  Round up and recycle plastic forks, napkins, a coaster, buttons and shells and declare a DIY with the help of a trusty glue gun.  Secure finished embellished brooch to dresses, bags, and tops with a safety pin to sass up your style.  Check out Design*Sponge for the FULL Step-by-Step tutorial P.S.- God Bless America, and the BBQ Brooch!


Bloom where you’re planted!  Currently, I am holed up in my summer house in Montauk, NY where I love entertaining! As I always say, Decorating and  DIY go hand-in-hand.  Whether you escape to a beach house or indulge  locally in summer entertaining, the perfect accoutrement is eye-catching  clusters of pretty flowers in bold vases of varying heights.  Inspired by pottery genius  Jonathan Adler’s vases and fashion designer Paul Smith’s famous colorful and happy stripes, (which I’m forever drawn to….yes-pun intended).   Make your own striped vases using empty milk cartons and Sharpie Twin Tip markers.  Cut the tops off, wrap with white masking tape and stripe away! 


Pollinate your Summer style with  Polynesian-inspired accessories.  Fashion’s tropical thunder is striking  from the shores to the city streets with this exotic trend.  The sounds  of South Pacific and Gilligan’s Island’s Ginger are classic Tropical  treasures I’ve always bowed down to, but my current crush stems from Richard  Nicoll’s SS10 collection which is alive with sprinkles of  hula-happiness!  Whether you’re on vacation or on your way to a summer  soiree, no tiki torch can hold a candle to this straw-sational statement  necklace. Pick up Straw  Finger Traps, reach for scissors and a glue gun and you’re  in business.  Cut and glue pieces of the straw finger traps together to  create rustic, lush flowers, then simply tie and knot them together with  twine to create your accessory.  P.S.- Get creative and make brooches,  headbands, and belts!


Summer Solstice is upon us and it’s time to get down with BBQ’s, Braids, and all things Beachy & Boho! I love to sport summer accessories that are easy, breezy, and will help crank up the temperature.  In keeping with my everyday modern and tres eclectic ways, I look to the Southern California vibes of the stylish Coachella festival, ROXY surfer chicks, tall teepees, and hints of Stevie Nicks. These sunny free spirits have a fashionable aura that I’m utterly in awe of and make me want to be part of their tribe!To make your beachy boho headpiece, get some rawhide material, colorful beads, feathers, and neon tape.  Braid approx 1.5 yards together, leaving some strands at the end to add beads and feathers.  Secure feathers on with Duct or Gaffers tape.   **P.S. - For all of you West Coasters, we will be on-hand making these headpieces with ROXY at PacSun’s Summer Solstice Beach Ballyhoo on the Santa Monica Pier.  See ya there!


I’ve been roped in to a DIY obsession that’s got me all tied up at the moment.  I cannot stop weaving and knotting for the life of me!  Currently, were seeing the macrame and summer crochet trend all over the place.  Don’t think hippie-chic looks and handwoven plant hangers- Macrame and crochet looks are back in a modern and wearable way.  Chanel’s SS10 collection is bursting at the seams with this delicate, light-weight design that’s to die for.  Oscar de la Renta proved this trend is gonna stick around for a bit as we spotted some macrame cameos in his Cruise 2011 show as well. To create you own version of this macrame-style rope necklace, grab a spool of rope and loop around your thumb.  Weave over and under your fingers, back and forth until you create 2 rows of rope of each finger.  Remove the bottom string over the top on each finger, until you leave just one row left.  Continue to weave over and under, always creating 2 rows of rope and pulling the bottom rope over the top.  After you’ve created your woven design, remove from the fingers, loop the strand through all the finger holes, add beads and chain- and you’re ready to roll!


  Dear Oscar de la Renta, Thank you for helping the  world realize there needs to be a clutch for something other than lipstick and  tic tacs!  Your new OdlR ipad clutches  recently caught my eye, while walking down the runway, and P.S.-  they’re j’amazing!  Far from Geek and beyond Chic, everyone wants an ipad AND your fab bag to tote them around in.  I “P.S.”-ed my own version using my fav Gorilla Tape, electrical tape ( to add striped detail ) and  an inflatable travel pillow  case!   I was inspired to create this project based on a competition I  participated in where the winner will receive an I Pad! This week I was asked to attend the first ever Charlotte  Russe Project Mannequin  Style-off Contest.   My theme was  a “Fashion Week” look.  I DIY’ed a necklace out to tights to  accompany a lace dress with an army shirtdress and Chanel-style bag.  Click  here to check out  the look and vote for me!  P.S-If I get the  most votes I win an I Pad for the  case I DIY’ed above! Help me win… and I’ll send a P.S.-  reader a DIY case too!  I’m in it- to win it.  Get involved! 


Whether you have the golden touch or were born with a silver spoon in your mouth, there’s no time like the present to indulge in the world of metallics! Gold and Silver materials are significant status symbols that wreak of high-end style.  Live luxe and love your interior surroundings by incorporating the recent wave of modern metallic accessories into your home.   First, reach for Kyrlon’s Metallic spray paint, available at any hardware store.  Next, find distinctive everyday objects such as kids toys or athletic/ sport items.  Hit up the local Dollar Store, which also has inexpensive offerings to spray.  Apply two coats of paint (be sure to spray in a well ventilated area).  Once dry, you have instant chic metallic accessories for your home!


To POM or not to POM: There’s no question about it!  This Spring season, pretty  palettes of sorbets have hit a sweet spot (yes, pun intended) and will carry us straight through summer with hints of Pommage infused. I have looked to budding Designer Chris Benz’s breathtaking sherbets with frocky skirts and dazzling jackets.  And I will be catching waves with Cynthia Rowley for ROXY’s killer collection wreaking of cool colors and neoprene niceness that boasts our magical Montauk oasis as my inspiration for this Designer DIY. Dip your spoon into a bowl of sorbet of accessories and infuse any other design crushes you may fancy. Hit up your ribbon/trim shops for fun size and color combos of Poms.  Sew onto different texture and lengths of chain and connect with pliers.  Remember to indulge just as you would with other succulent treats like Sorbets and sweet Macaroons! Speaking of which, just bought this j’amazing book on Macaroons- P.S.- Get it and Make it!


Clarity is a rarity and we strive to achieve it!  As I’ve gushed, all things with see-thru hues are first-rate especially when we’re highlighting beautiful fixtures that have really become fixtures in our everyday lives. An eye-catching light fixture or chandelier creates a bold and elegant element in any space!  For this bulb-baring project, you simply need to empty water bottles, not your pockets!  Slice a bunch of bottoms off bottles- I prefer to live greener with Dasani’s Plant Bottles, pierce holes using a pin, string and knot fishing line, hang evenly around a circular tube  (find tubing at your local hardware store).  Drop in a lamp kit- and you’re ready to light up your life! P.S.- Click here to enter the Green hat give-away from now until Earth Day!!!


CHEVRON: ˈsh evrən. Noun. A line or stripe in the shape of a V or an inverted V.  Use this translation and interpret you own chic representation and prepare for Craft-off! The chevron pattern became popularized by adorning sleeves of uniforms indicating rank or length of service, but more recently have taken over the Fashion and Interior worlds with the bold markings.  Givenchy’s SS10 collection is ALL about the Chevron in B/W hues, where as bright dressers were spotted on Design*Sponge, and cool ‘n casual tanks from Club Monaco keep us feelin’ flirty! Pick up some retro Barbershop-inspired Paper straws. Glue together was a few dabs of hot glue to make your chevron pattern.  Trim straws to desired length and shape, glue together (feel free to trim again), and poke a little hole in the top where your earring wire can slide through.   P.S.- Show off your Chevron & your true colors ‘cuz you are J’amazing!


PS- Don’t shoot the messenger… Make one! All of us live full, beautiful lives and are forever on the go searching for that perfect bag to carry us through our day.  Somewhere over the rainbow, there is a carryall fit for your inner Miss.Rainbow Bright.  Inspired by Proenza Schouler’s Mini Sac clutches  the popping rainbow hardware is one way of bringing a dose of sunshine in your shade.  For the messenger that boasts the most this season- look to Louis Vuitton for phenomenal over-the-shoulder sacks and belt bags. Yes, fanny packs are back… Hands-free is the way to be. Reach for a plain canvas tote you may have leftover or purchase a new one.  Head to your local hardware store for a plethora of colorful carabiner clips (which are really for function not fashion).  Clip ‘em up to make a chain, cut off the handles, poke 2 holes for the strap and attach!  This Spring, reinvent and replace your pot ‘o gold at the end of the rainbow with a messenger bag.


Summer is upon us, which means we’re all showing a tad more skin and a lot more accessories.  What better way to be bold than baring a sleek cuff bracelet? Diane von Furstenberg’s Sahara bracelets have been keeping me up at night, as I dream about the chunky woven, stacked beauties.  Paired with bold colored dresses and eye-catching skirts, a cuff bracelet is the icing on the cake! For your version of a vivid cuff bracelet, pick up jumbo hair rollers. Chances are your local beauty supply store will carry.  Use long pieces of colorful embroidery string or thin rope for your striped accent.  Weave in and out the roller holes, and double knot off at the end.  P.S.- if you use a a nylon material, be sure to burn the ends of the knot so they don’t fray.  Show your stuff… sport a chic cuff!


What’s not to love about Cartier’s Charity Love bracelets?  In 2006, Cartier partnered with 24 high-profile and big-hearted Celebs including the likes of Eva Mendes, Scarlett Johansson, Salma Hayek, and more!  Each satin cord signature bracelet has a dedicated Charity partner in a corresponding color, where the proceeds will benefit. My version of the delicate bracelet inspired by this wonderfully chic and charitable initiative just so happens to be in Sarah Jessica Parker’s hue in blue which has partnered with UNICEF.  Hit up your local hardware store for small key rings and hex nuts for your version.  Be sure to singe the satin cord knots with a very quick burn using a lighter- but be careful!  Safety first!  P.S.-Click here to download the PDF that shows you each Cartier Charity partner for the Love bracelets!  http://www.love.cartier.com/cartier_love_charity.pdf


Safety is the name of the game when it comes to all things Fashion and Designer DIY.  Right now delicate metallic safety pins are all I can think about.  They are truly a marriage of fashion and function for all.  Versace’s Verses, Vena Cava, Moschino, Marc Jacobs and Tom Binns all look to the safety pin to adorn apparel, accessories, and jewelry with an incredible embellishment. I picked up some gold-tone safety pins at my local hardware store.  Dollar Stores and Art stores carry as well.  Slip several pins together, creating clusters. Pin all over the collar and attached clusters to create a bold effect around your neck.  Get creative with colored safety pins and adorn other apparel and accessories! P.S.- Pin it to win it!


The lovely ladies from http://www.whowhatwear.com gave me a spectacular springtime summons for a Designer DIY that was inspired by the dashing duo, Proenza Schouler.  We both agree that the tie dye trend is full on and in the fashion house’s fore front. PANTONE named TURQUOISE as the color of 2010, which was the foundation for this vivid Surf infused Spring/Summer Collection, which left hearts pumping and toes tapping to try on.  I’m not only partial to Proenza because we share the same “PS” initials, but I truly admire the staggering talents of Jack and Lazaro as they continue to wow us season after season.  They just announced their online click-able shop http://www.proenzaschouler.com where we’re counting down seconds to snag a mini PS1 purse! PS- I LOVE PS! That stands for Proenza Schouler for all of you abbreviation illiterates Pick up some to DYE for colors here for your own take on this designer inspired look http://www.ilovetocreate.com/tulip.aspx

Confession:  I’ve recently fallen madly in love.  Who’s my new lover you ask? Ohhhh, It’s Chanel’s Spring Couture collection.  My eyes were locked on these delicate tulle and lace frocks that were topped off with sweet and chic headpieces that made my heart go pitter-patter!  Between Uncle Karl’s new collection, Victor & Rolf, and Marchesa’s delicate drama, massive amounts of tulle and rosette details make me do pirouettes and pas de bourrée like a Prima Ballerina! This Valentine’s Day, fall in love a little harder with a headpiece. All you need for this whimsy accessory is some scrap fabric, ribbon and a needle ‘n thread. P.S.- Love is in the air!


I’m over the moon about getting to work with one of my all time favorite brands, HELMUT LANG!  To inaugurate & celebrate this refreshing Spring collection, I have created necklaces, bracelets, and scarves out of their amazing  leathers, denims, and t-shirt materials.   These accessories are currently paired with their spring looks in the windows of BLOOMINGDALE’S Lexington Avenue Flagship location!  Click Here to check out Modelina’s coverage of the windows and the DIY event I hosted on February 3rd!


My heart goes pitter patter for all things painted with a splatter.  Recently we’ve been seeing loads of this refined messiness.  The Jackson Pollock-esque painted fashions are in full force right now.  The late and GREAT Alexander McQueen last graced us on the runway wearing a pair of butcher oxfords with a splatter finish and used in his Spring collection. Tory Burch and Proenza also recently rocked this artistic touch on the runway during Fashion Week. Throw a few brush strokes down and then dip ur brush in paint and flick your fingers away creating a haphazard design on jeans and oxfords.  I used Urban Outfitters jeans and Oxfords (Frye brand)- they have loads of cool oxfords, so peep ‘em and paint ‘em.


Denim on denim it a DO for Spring 2010.  The lovely ladies from Who What Wear and I both agree that Chloe’s cool and casual indigo layered look is one of the strongest trends of the season and we want IN! Style together for a full on runway repertoire or rock the patch-worked pieces separately.  Dig into your closet for medium and light wash jeans or pick up a new pair to embellish. Check out Forever 21 for a wide variety of denim and also over-sized Denim and Chambray shirts.  After cutting up your jeans into patches, pin and sew accordingly.  If you’re not the best seamstress or want to cut some corners- opt for fabric glue!  Just make sure you wait 72 hrs till dry and wash inside out. 


Fringe benefits for all!  The wispy and free-flowing details are frequently favored, seen on apparel and accessories as well as luxe interiors.  Made from tightly bunched strands of string, tassels are most commonly used to add decorative touches.  The eye pleasing and finger feel-good fringe, is available at your local trimming, interior store. I picked up a lovely pair of light lavender (the go-to color at this years Golden Globe awards), and popped by the hardware store for some mini hex nuts and washers.  Stack a few onto the tassels, topping it off with an edge.  Slip on your earring wires and you have a a little drama to dangle on… Follow your heart and fall into fringe!


You’ve heard of the Art Deco era, but what’s it all about?  This was a time when sophistication, refined fashion, and edited elegance were in full force.  I look to this treasured time for clean lines, angular definitions, and luxe detail.   The Empire State Building in NY, Sunset Tower in LA, and Collins Avenue in Miami are some of my Architecture crushes.  Pulling from these iconic buildings, I decided to channel this vibe into jewels! Hit up your local hardware or home store for mirror clips.  Add some chain and earring wires, and you have your version of this Art Deco inspired fashion accessory.  Make it modern, make it yours!


Every little girl at one point in her life went through the BIG bow phase, me included!  If you’ve taken notice of the catwalks or scanned the fashion magazines you will see that bows are back in a BIG way!  Our style stars have been spotted adorning all sorts of delicate and whimsical, over-sized head wear all over the place.  From the Louis Vuitton bunny/bow ears to Marc Jacobs, Milly, and Sportmax runways, this trend is full on and taking over- you should too! To make your beautiful bow, cut a trash bag (4”x6” approx.), gather it, tape it, wrap it in pretty french lace (or another fabric of your choice), add a ribbon and tape again.  I love Gorilla Tape- its super strong and its shiny black finish looks just like leather- Trust! Available at most hardware stores. Take a bow… you made a BIG bow!


When ReadyMade Magazine asked me to collaborate and contribute for their special Holiday issue,  I was pretty psyched to create some fun & festive decorations.  I dug deep into my stash of items laying around the house to see what I could create with.  I love finding ways to re-purpose everyday items from my kitchen to my craft closet…as you know! To make this rope wreath, hit up your local craft or floral store for a plain foam wreath.  Begin by securing your rope (clothesline works great) with glue on the back.  Wrap and glue on the back side as you go so the front stays nice and clean.  Use pinking sheers or regular scissors to make sponge leaves.  Make holly clusters with sponge leaves and buttons all over wrapped-wreath, securing with glue.  Apply a generous dose of spray paint (I love Krylon) and hang with a fun colored ribbon. Pick up this months issue of ReadyMade Magazine to see my other DIY Projects.  PS- Its the perfect way to say happy HOLLY- DAYS this season!


My soul sister, Aretha Franklin was onto something when she belted out the iconic Anthem, “Chain of Fools”.  We see versions of these utilitarian strands all over.  Streets to stylish runways- chains are a staple.  In an effort to update your look, follow this bold trend of layering by draping and clipping materials you may have laying around the house. With a few colorful rubber bands and binder ring clips (hit up your local Staples!) you can have a chic cascade of chain to rock. Get creative with your chains- mix up the colors, sizes, and even double up on the rubber bands for a more dramatic drape. CHAIN THE WORLD… MAKE IT A BETTER PLACE (yes, I Chain’ed the lyrics).


Winter White is where my heart is heading.  Crisp hues of white mixed with shiny metallic details is a must for mixed media.  Any addition of nails heads and studding is always super chic and classic.  These dotted details are found on furniture to fashion. If you have spare shoe boxes or jewelry boxes this is a great face lift project that screams Designer DIY. Cover boxes with white paper or use spray paint or buy new ones. Mine came from the Container Store http://www.containerstore.com/shop/giftPackaging/giftBoxes?productId=10003735 Hit up your local hardware store for upholstery tacks and thumbtacks.  Push them into the boxes, create patterns, spell out your initials- get creative! Use for a decorative accent on display- also makes a great gift wrap.


I‘m MAD for PLAID.  This long time Tartan tradition has been sported by Royals, seen on runways, not to mention a few rugged fellas.  Unless you’ve been living under a rock, you surely have been wearing or watching out for the lumberjack look. Season after season, Alexander McQueen and Burberry give us healthy doses of plaid.  Recently, Pendelton’s collaboration with Opening Ceremony and go-to tops from Urban Outfitters and Aéropostale have also been on our plaid radar. This quick Designer DIY is a fun way to change up your plaids just by adding a hint of shine. Use vintage plaids, your boyfriends shirt (don’t forget to ask).  When poking your studs thru- use a back of a spoon so you don’t hurt your hands.  Have fun!


In the words of Amy Winehouse,  ”I go back to black…”   Nothing says bold like the darkest hue of them all.  Every design house at one point or another creates sharp looks in black that stand alone or play well with others in your closet. Experimenting with different silhouettes of black is the perfect way to stand out and make a statement.  Revel in round tube shapes by combining plastic rollers, chain, and ribbon.  If you can’t find black- use a can of matte black Krylon spray paint for a clean coat.  Rollers also come into tons of other colors, so have a few extra options on hand for when you need to add a pop of color to a bad (in a good way) black look. PS- rollers rule!


Fur-get about authentic pelts!  Fakes are Faux-real! Everyone should have a furry luxe vest in their wardrobe, no ifs ands or buts about it. With a trip to your local fabric store and your trusty scissors, you will have chic traffic-stopping outerwear in minutes!  Get approx 1-2 yards of faux fur fabric, lay out on a flat surface. Cut a large circle.  Measure the width of your shoulders and make two narrow openings in the center.  Brooch it!  Belt it!  Bear it!


Confession! I’ve always been fascinated (and slightly jealous) of those stuffy private schools who got to sport super cute prep school uniforms.  I think enforcing fashion is a fabulous policy!  I’ve decided to live vicariously through private school peeps and re-create an accessory that brings out my inner prep; with a little edge.  A few snips, a dabs of glue, some shiny ropes and chain is all it takes to turn posh inspired school fashion into an amazing accessory. PS- Hit up www.mjtrim.com  for great patches, chain, and ropes… they have the sickest collection if you don’t want to use your own schools patches.

In the famous words of Beyonce…. “IF YOU LIKED IT THEN YOU SHOULD HAVE PUT A RING ON IT.. OH, OH, OH!” PS- I LOVE rings! Cocktail, silver & gold bands, gem stones, hammered metal, funky studs.  My collection of ring styles span from A-Z but I don’t have enough fingers to sport them all.  Here’s the perfect solution to showcase your rings, and make a statement… necklace that is!  All you need are a few ring-a-dings and a string, rope, or ribbon! Oh, Oh Oh!


If you haven’t been struck by the tie die movement that has come back in a big (and amazing) way… then you’ve been living under a rock.  The hippie loving color burst designs have been seen on runways, fashion mags, and found their way into my closet! Have fun tie diy’ing (as i like to call it) with just about anything and everything… get creative and re-invent your bags, dresses, scarves, shoes! For a fast, fun, and easy alternative to liquid dye- try Simply Spray.. its to DYE for!  http://www.simplyspray.com/ Peace. Love. and Tye Dye!

Q: Still clinching onto summer short shorts? A: Clutch ‘em! Turn your denim daisy dukes into a super cute clutch.  Cut the bottoms off.  Flip inside out.  Stitch the bottom.  Turn right-side up.  Stick velcro along the wasit band for closure.  Stud the top with metal grommets to give it an edge.  Use for an evening bag, make-up case, or a chic tool bag ;) its a denim DO for Fall!


There’s a gray bird on my shoulder, its the truth, its actual, everything is satisfactual!  Zippadedoodaa…  Yes, the bold shoulder is in full effect.  Try your own take on this dramatic “Dynasty” style by updating and embellishing with delicate feathers and edgy gems.  Nothing says decadence like a little splash of a statement shoulder! Secure to blazers, tee shirts or dresses by adding safety pins, or velcro.  Get creative with color combinations and sparkly gems!  Hit up www.mjtrim.com for all your razzle dazzle shoulder needz. PS- go big or stay home!


Welcome to Mixed Media 101.  I’m totally roped into RHINESTONES and ROPE! This unexpected combo makes for a fun and chic dynamic duo.  Combine hard and soft textures, dull and sparkly accents, layering materials in sporadic and whimsy swirls.   Swirl and glue your rope, Knot and snip ends, dazzle with rhinestones, slip on your earring wire, and you have a phenomenal pair of earrings!  (PS- try www.mjtrim.com for lots of decorative metallic rope options). Expect the unexpected, and you will be pleasantly pleased!  After all, fashion should be fun! Throw out the rules, mix and match till your little heart desires. Class dismissed!


I’m seeing spots! The good kind. Beaded details can be summed up in one word- j’amazing.  Recreate and redecorate all at once.  I decided to channel this motif into my deep pottery passion/obsession. Have fun with this simple, design inspired decorative project.  Its the perfect way to re-purpose empty cans, bottles, containers without dropping a small fortune on pretty porcelain. Ceramic Skinny: Check out all the amazing ceramics that hail from West Germany from 1950-1970.  The designs are beautiful.  Fast forward to our modern-day prince of pottery,  Jonathan Adler.  Mr. Adler is quirky in all the right ways.  His tortoise lamp is currently top on my wish list! PS- Puffy Paint will totally bring you back to your early art project days!


Baubles ‘N Bubbles.  They breathe a lightness and lend themselves to beautiful sphere shapes, which are perfect in the most imperfect way.  Their translucent white and clear crystal hues are deliciously delicate.  Mmmmmm how I love, thee! An easy and unexpected way to create your own version of this look is with tape!  I love the selection at Staples!  I found mini-packing tapes which I strung on pretty black chiffon ribbon with Hex nuts in between.  Knot a few on the ends for a more stylized-finished look, and you’re ready to  sport your translucent-esque treasure!  Experiment with different size tapes and colored ribbons! Have fun!


I’ve been riding horses since I was 10.  Everything inspired by the Four-legged beauties makes me giddy, especially the get-ups!  Classic country clubbers sport Ralph Lauren’s designs.  Edgy and elegant show horses gush for D&G over-sized ribbon pins.  Anyway you sway, there’s a designer that is sure to tailor this sensible and seemingly chic genre for you. Make you own first prize equestrian pin by using a few dazzling gems, buttons, or even broken bits you may have laying around.  Glue onto a cupcake paper and add some wide ribbon for the final touch!  Pin to handbags, blazers, anywhere! PS- Stallion not included!


It’s Electric! (Wire, that is).  Right now, I’m really into sporting and stacking bright, vibrant bangle bracelets.  The more the merrier, I say!  On my trip to the hardware store, I was inspired by reams of electric wire hanging from the walls.  Mixed with some fun neon and metallic tape, this combo is spot on!  Make your bangle bracelet as big as you wish.  Get creative with other colored tapes and colored wires.  ps- don’t wear in water, have fun getting wired! xx Erica


You have read this article DIY with the title DIY!. You can bookmark this page URL http://blackpoetrypmrapedtwice.blogspot.com/2011/01/diy.html. Thanks!
Related Posts Plugin for WordPress, Blogger...